Getting Started
The e-commerce starter application aims to deliver a good starting point of Apostrophe CSM based e-commerce solutions, using the wide variety of features and techiques prvodied by the Apostrophe core.
Try it on Codespaces
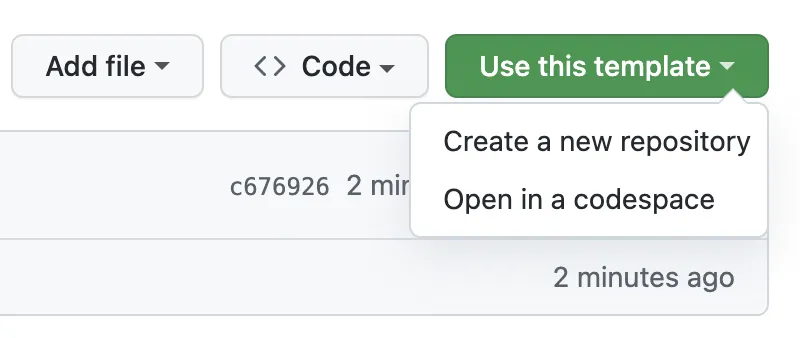
You can try the starter kit on GitHub Codespaces. On the main page of the apostrophecms/starter-kit-ecommerce repository, under the "Template" dropdown, choose "Open in a codespace":
You can find a detailed guide at https://docs.github.com/en/codespaces/getting-started/quickstart using.
TIP
When codespaces is initialized for a first time, it will take some time to install the dependencies and build the application. You can check the progress in the "Terminal" tab. Once the application is built, you can start the application via npm run dev.
You may see an initial screen of the MongoDB extensions. You can safely ignore it and close the tab. No configuration is needed for the application to run.
Local Installation
TIP
You will need the proper Node.js environment, a MongoDB up and running, etc. Follow the official documentation for more information.
Method 1
If you haven't already, install the Apostrophe CLI tool using
shnpm install -g @apostrophecms/clinpm install -g @apostrophecms/cliClone the project locally by navigating to the parent directory you want the repo installed within and run the command:
shapos create my-project-name --starter=ecommerceapos create my-project-name --starter=ecommerceChange to the new directory and run it:
shnpm run devnpm run dev
Method 2
- Choose "Use this template" button on the main repository page and create your own repository:

- Clone it (replace
user/repo-nameas appropriate)
git clone git@github.com:user/repo-name.gitgit clone git@github.com:user/repo-name.git- Install the dependencies
npm installnpm installOptionally, you can update the core dependencies to the latest versions:
npm updatenpm update- Run it
npm run devnpm run devInitial configuration
- Change the
shortNamevalue in your configuration inapp.jsnote that installation using the CLI will complete this step automatically.
import apostrophe from 'apostrophe';

apostrophe({
  root: import.meta,
  shortName: 'my-project-name',
  // ...rest of the configuration
});
import apostrophe from 'apostrophe';
apostrophe({
root: import.meta,
shortName: 'my-project-name',
// ...rest of the configuration
});- The control for restarting the application on change (dev mode only) has been moved to
modules/theme/index.jscompared to the defaultstarter-kit-essentialsapplication (assetmodule). If you want to disable this feature:
// modules/theme/index.js
handlers(self) {
  return {
    '@apostrophecms/page:beforeSend': {
      webpack(req) {
        req.data.isDev = (process.env.NODE_ENV !== 'production');
        req.data.isDev = false;
      }
    }
  };
},
// modules/theme/index.js
handlers(self) {
return {
'@apostrophecms/page:beforeSend': {
webpack(req) {
req.data.isDev = (process.env.NODE_ENV !== 'production');
req.data.isDev = false;
}
}
};
},Production
You need to build the application and execute the migrations when starting it in production:
npm run release
npm run start
npm run release
npm run startArchitecture
The starter kit is a standard Apostrophe CMS application, built on top of the official starter-kit-essentials template. All the modules (including widgets) can be found in the modules/ folder. You can learn more about the modules in the Modules & Widgets section.
The entire UI (except the product view page) lives in the theme module. The application uses a standard Tailwind CSS configuration. You can learn more in the Branding & UI section.
We have developed a tool for automated SVG sprites. It's seamlessly integrated and is explained in detail in the Branding & UI section.